Getting Started
Welcome!
Welcome to Fracture! Let's get you set up and ready to break your first instance into physics-driven pieces.
We'll start by downloading and importing the .yymps package and preparing your project in Installation. Then in First Setup, we'll walk through fracturing your first instance and see how Fracture breaks it into Box2D pieces. By the end, you'll have a simple working example that shatters an instance when you click on it.
TIP
Throughout this page, and the documentation as a whole, you'll see many hyperlinks to key Fracture concepts. I encourage you to explore them briefly as you get started, as they'll help you quickly understand the library's overall structure.
Requirements
- GameMaker version LTS 2026.
- Basic familiarity with GameMaker and GML, including:
- Asset types (rooms, objects, scripts, sprites, etc).
- Working with objects and events.
- Structs, functions and methods, macros.
- Familiarity with GameMaker's Box2D physics is recommended but not required. Fracture handles the heavy lifting, so you can pick up the basics as you go.
Fracture is a fairly specific library that makes some assumptions about your project and needs a bit of setup before you fracture anything. The two big ones to know upfront:
- Room Physics must be enabled in any room where Fracture is used, since Pieces are handled as Box2D bodies.
- Fractured instances must have a valid non-vector sprite assigned, and their image_xscale/image_yscale must be positive.
See the full Requirements page for the complete list before you get going, including physics world geometry, depth sorting, and scale limitations.
Installation
First, download the .yymps local package from the latest GitHub Release.
Next, import the package into your project.
- Navigate to Tools in the top toolbar and click Import Local Package, or just drag and drop the file into GameMaker.
- Locate and select the downloaded
.yympslocal package in Explorer/Finder. - Click Add All, then Import.
What's Included?
Everything lives inside the Fracture folder:
- (System) folder with internal library code. You never need to touch this.
- Fracture that holds the main interface you'll call all methods on.
- Fracture Info note with general info and links.
- FractureConfig that holds configuration macros for tweaking defaults.
- FractureConstants that defines the Shapes constants.
The only file under Included Files is the MIT license.
You're good to go! Continue to the First Setup section below to fracture your first instance.
TIP
If you already have Fracture installed and want to update to the latest version, check the Updating FAQ entry for instructions.
First Setup
Let's set up a simple example. We'll fracture some non-physics Box-shaped instances with a few different patterns, then add an Impulse to send Pieces flying.
ℹ️ Download the Fracture First Setup.yyz example and poke around as you read.
Lay The Groundwork

Starting from a fresh project with the library imported, we'll create the object we'll be breaking. We'll call it objShape and give it a simple box-shaped sprite.
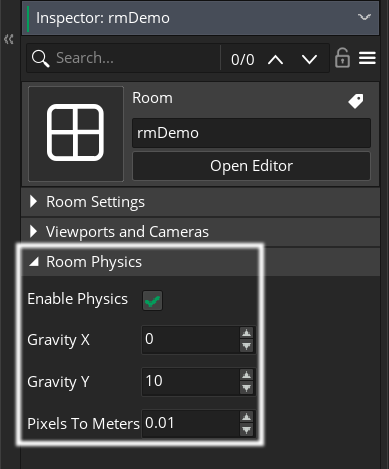
This object won't be physics-enabled itself (although it could be, Fracture supports both), but the Pieces it breaks into are physics-driven, so we need to enable physics in our room either through the IDE or programmatically.
NO PHYSICS CRASH
If you forget to enable physics in a room where you use Fracture (or any other Box2D features), you'll get a crash saying: The current room does not have a physics world representation.
Our shape is fairly big at 148x148, so we'll set the room's Pixels To Meters scale to 0.01.
Why 0.01?
Physics behavior depends on the room's Pixels To Meters scale. At the default 0.1, our shape reads as ~15 meters wide, so it drifts around like a slow-moving giant instead of shattered debris.
Dropping to 0.01 makes each pixel a centimeter, putting the shape at a believable ~1.5 meters where Pieces fall and tumble the way you'd expect.
To show that Fracture works with instances of any (positive) scale, we'll add a Create event to objShape and randomize its scale. Our sprite also comes with a few frames, so we'll randomize that as well.
/// @desc Randomize scale and frame

image_xscale = random_range(1.2, 1.5);
image_yscale = image_xscale;
image_index = irandom(image_number - 1);
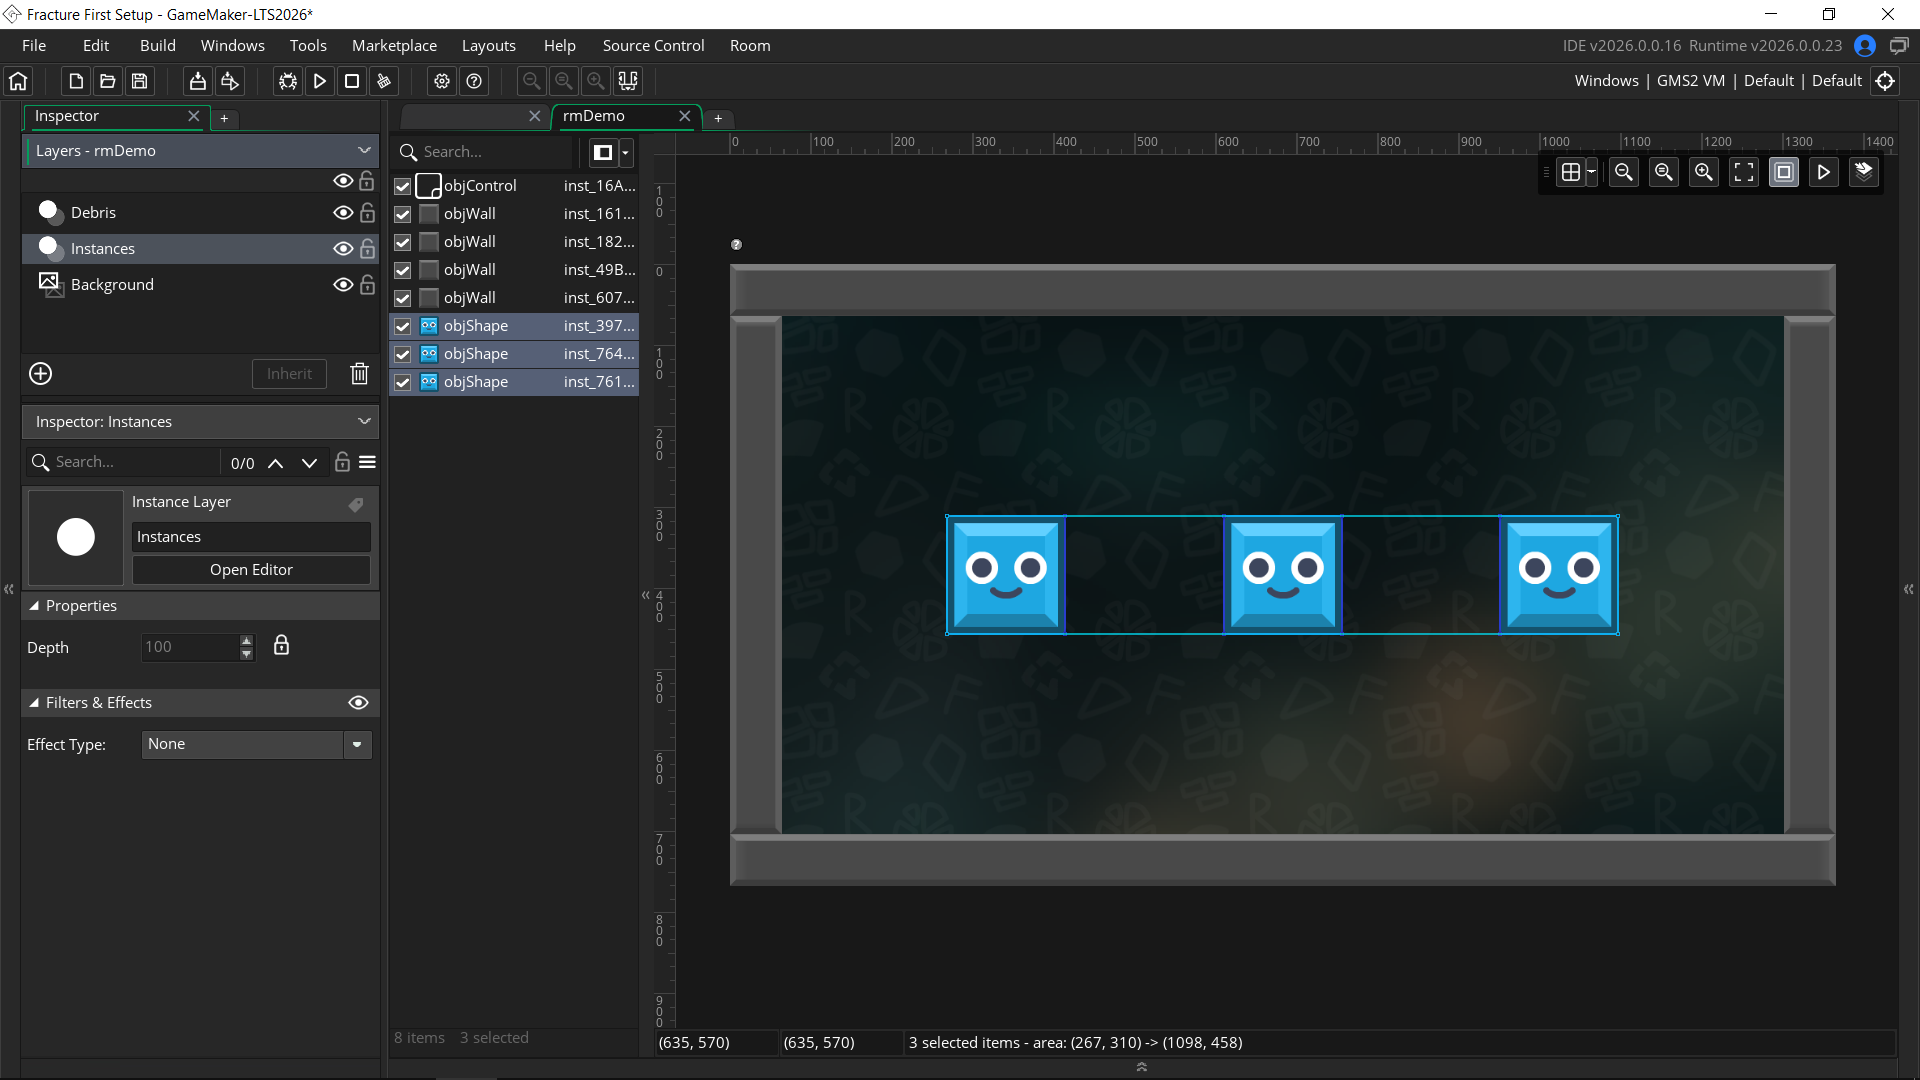
Finally, we'll drop a few instances of objShape in our test room.
Take Control
We'll also make a controller object called objControl and place it in the room. It sets the layer Fracture renders Pieces on in the Create event via .RenderAt(), and restarts the room when pressing R so we can try different fracture results without relaunching the game.
Our room has a Debris layer sitting just above Instances, so Pieces will draw in front of shapes and walls.
/// @desc Set Fracture rendering layer

Fracture.RenderAt("Debris"); /// @desc Restart room
room_restart(); Pieces aren't drawn by the instances themselves. They're all rendered together in one batch by an internal renderer object, and that batch needs a single depth to sit at. .RenderAt() sets it by pointing at a layer in the room.
See Rendering for more details, including how the shared vertex buffer works and why Pieces can't be depth sorted against other instances.
Set Boundaries
Before we fracture anything, our room needs something for Pieces to collide against. Without any physics geometry, Pieces would just fall straight out of the room.
We'll make a wall object called objWall with a simple 64x64 box sprite and check Uses Physics on it. The defaults are fine across the board, with one exception: we'll set Density to 0 so the wall stays static and never moves.
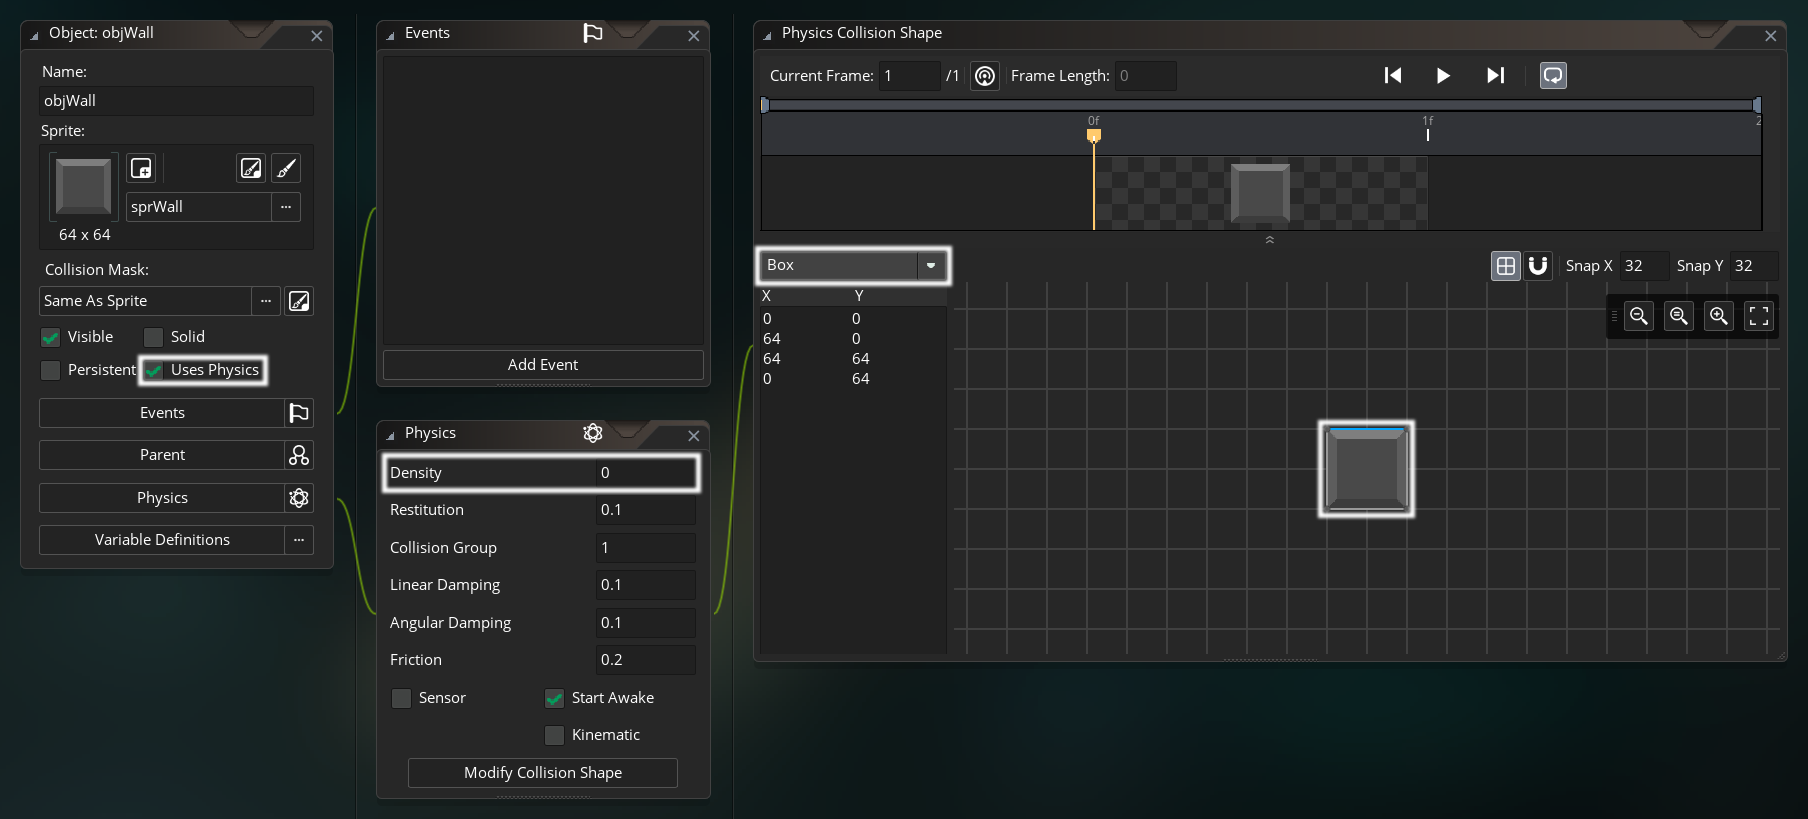
Then we'll place scaled objWall instances around the room to seal it in.
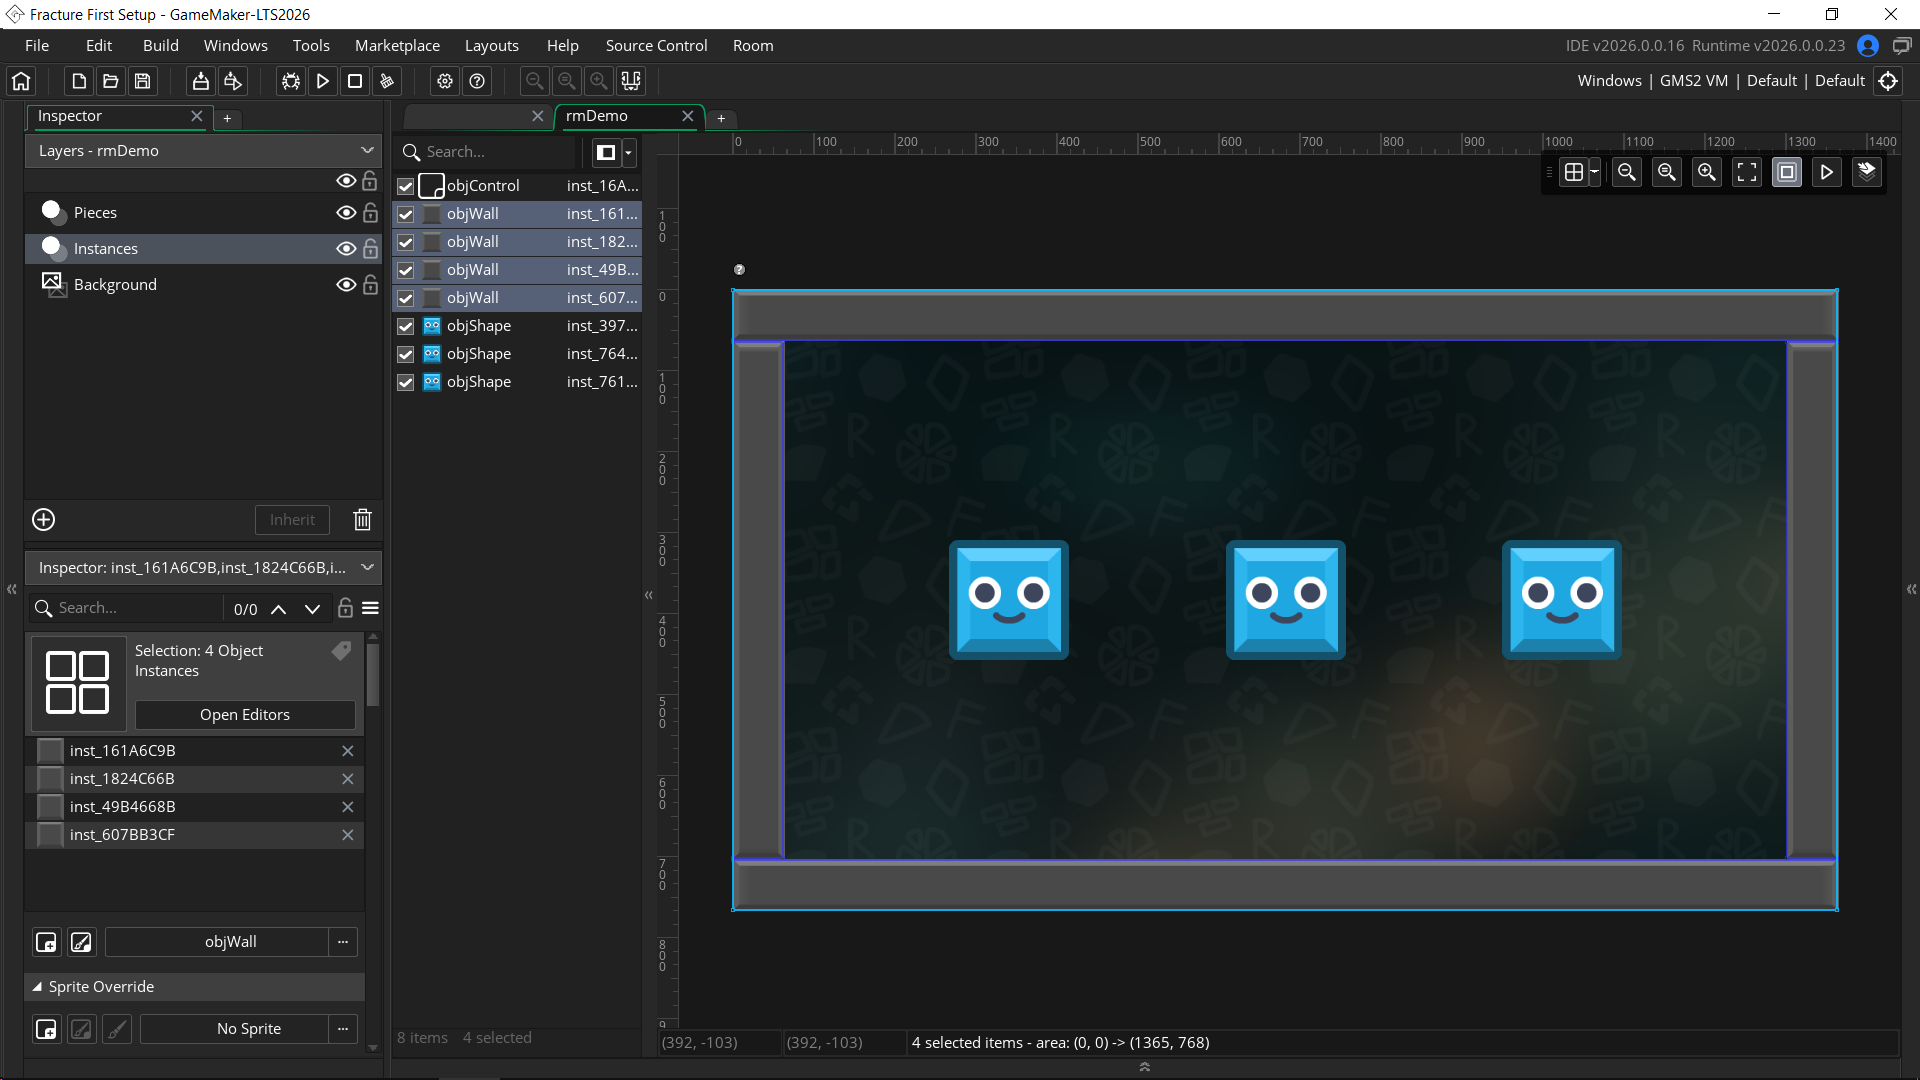
Now our room is sealed and any Pieces we create will collide and bounce against the walls.
Break The Shape
Now to the fun part!
We'll add a Left Pressed event to objShape. This is where we'll fracture the shape by clicking on it.
Let's use one of the available Patterns to fracture the shape. We'll go with Grid here, passing in the instance ID to fracture (our own id), the Shape constant (FRACTURE_CONVEX_BOX in our case), and the number of rows and columns.
/// @desc Fracture

Fracture.ConvexGrid(id, FRACTURE_CONVEX_BOX, 4, 4);
Unusual Syntax?
You might notice this syntax is a little different from the functions you're used to in GameMaker. In short, we're using a function as a makeshift namespace. Read about why over in the API Overview.
That single call destroys the calling instance and creates the resulting physics Pieces defined by the pattern and its parameters. That's all it takes to perform a basic fracture!
Let's test it!
Running the game now, we click a shape and it shatters into Pieces that fall and settle against the walls.
You'll also see them fade out after a delay. They destroy themselves once fully transparent. That is Fracture's Fading system at work, which you can fully customize per fracture call via the .Fade() settings method.
OUTPUT LOG
Looking at the Output window in the IDE, we'll see a message summarizing the fracture. It tells us what was broken, into how many Pieces, and how long it took.
[Fracture] ConvexGridBox: Fractured <objShape> into 16 pieces in 0.17ms.Mix It Up
One pattern gets repetitive fast. Fracture ships 7 Patterns total, so let's play with some variation.
We'll pick a random one on every click: Grid for regular subdivision, Radial for slices radiating from a point, and Voronoi for organic-looking shards.
Note how .ConvexRadial() takes more than just a count. We pass it the number of slices, an angle noise value, and a world position to radiate from, so the shape splits outward from our mouse position.
/// @desc Fracture with random pattern

switch (irandom(2)) {
	case 0: Fracture.ConvexGrid(id, FRACTURE_CONVEX_BOX, 4, 4); break;
	case 1: Fracture.ConvexRadial(id, FRACTURE_CONVEX_BOX, 8, 0.5, mouse_x, mouse_y); break;
	case 2: Fracture.ConvexVoronoi(id, FRACTURE_CONVEX_BOX, 10); break;
}
Each pattern takes its own parameters, but the first two are always the same: the instance to fracture and the Shape constant. See Convex Fracturing for the full list.
Blow Things Up
We've got our shapes fracturing, but the result is a little underwhelming. Pieces just drop straight down with no force behind them. Let's add an Impulse to sell the shatter!
Before the switch, we'll add a .Impulse() call to apply an impulse to every Piece created by the next fracture. We'll give it a strength of 1.5 and originate it from the mouse to get a directional explosion.
/// @desc Fracture with impulse and random pattern

Fracture.Impulse(1.5, mouse_x, mouse_y);

switch (irandom(2)) {
	case 0: Fracture.ConvexGrid(id, FRACTURE_CONVEX_BOX, 4, 4); break;
	case 1: Fracture.ConvexRadial(id, FRACTURE_CONVEX_BOX, 8, 0.5, mouse_x, mouse_y); break;
	case 2: Fracture.ConvexVoronoi(id, FRACTURE_CONVEX_BOX, 10); break;
}
Note that .Impulse() is called before fracturing. Settings apply to the next fracture regardless of which pattern runs, so we set it once before the switch.
Picking a Strength
The right strength depends on your room's Pixels To Meters scale, so 1.5 works here but won't translate directly to a different setting. Expect to play around with the value until the shatter feels right for your game.
Running the game again, our shapes burst away from the mouse. Awesome!
CHAINING
Settings methods return Fracture itself, so you can chain them straight into the fracture call using the Fluent Interface API.
Fracture.Impulse(1.5, mouse_x, mouse_y).ConvexGrid(id, FRACTURE_CONVEX_BOX, 4, 4);Our switch keeps them separate only because we'd have to repeat the chain in all 3 branches.
Why Small Pieces Fly Faster
You'll notice smaller Pieces shoot off faster than big ones. Box2D derives a fixture's mass from its density and area, so a small Piece is lighter, and the same impulse moves it further.
That's usually what you want, but .Mass() overrides it and gives every Piece the same mass regardless of size.
That's It!
And we're done! That's a complete working fracture: a clickable instance that shatters into physics-driven Pieces that fade away on their own.
Now that everything works, try swapping the Shape. Give objShape a round sprite and pass FRACTURE_CONVEX_CIRCLE, or an irregular one with FRACTURE_CONVEX_HULL. Every pattern accepts all 3 shapes, so the same calls clip the Pieces to the new silhouette.
This is of course just a quick demonstration. The same flow fits wherever your game needs it, whether that's a crate shattering on impact, an asteroid blown up by a rocket, or an enemy bursting into Pieces on death. You set the needed Settings, pick the right Shape and Pattern, and fracture your objects.
From here, I'd recommend working through pages under Topics, starting with Requirements, then Pieces and Rendering, to get familiar with how Fracture works. The API section is there to reference along the way whenever you need the details on a specific pattern or setting.
Now go break some things!