
Getting Started
Welcome!
Welcome to Figgy! Let's get you set up and ready to create your first configs!
We'll start by downloading and importing the .yymps package and preparing your project in Installation. Then, in Usage, we'll walk through defining your first config layout and exploring how Figgy converts your widgets into a usable config struct. By the end, you'll have a simple working example that lets you define configs, access them easily in your objects, and edit them live using the Figgy Interface.
TIP
Throughout this page, and the documentation as a whole, you'll see many hyperlinks to key Figgy concepts. I encourage you to explore them briefly as you get started, as they'll help you quickly understand the library's overall structure.
Requirements
- GameMaker version LTS 2026.
- Basic familiarity with GameMaker and GML, including:
- Asset types (rooms, objects, scripts, sprites, tilemaps, etc).
- Working with objects and events.
- Structs, functions and methods, macros.
Installation
1. Download
Download the .yymps local package from the latest Release.
2. Import
Import the package into your project.
- Navigate to Tools in the top toolbar and click Import Local Package, or just drag and drop the file into GameMaker.
- Locate and select the downloaded
.yympslocal package in Explorer/Finder. - Click Add All, then Import.
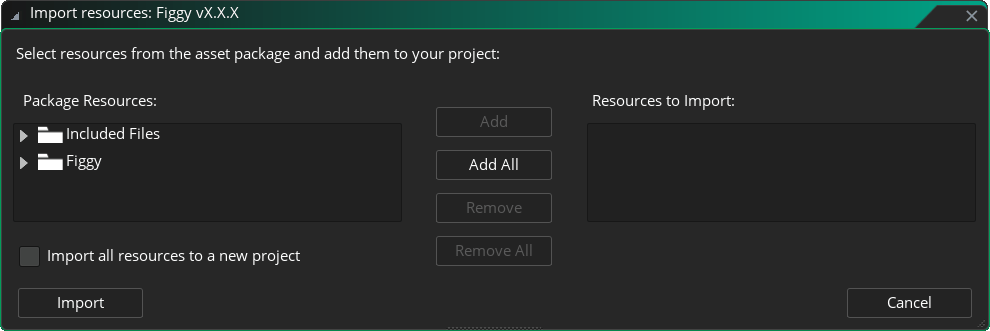
The whole library lives inside the
Figgyfolder, and the only file underIncluded Filesis the MIT license.
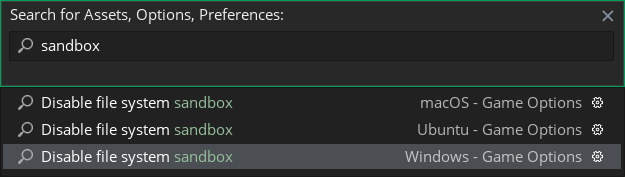
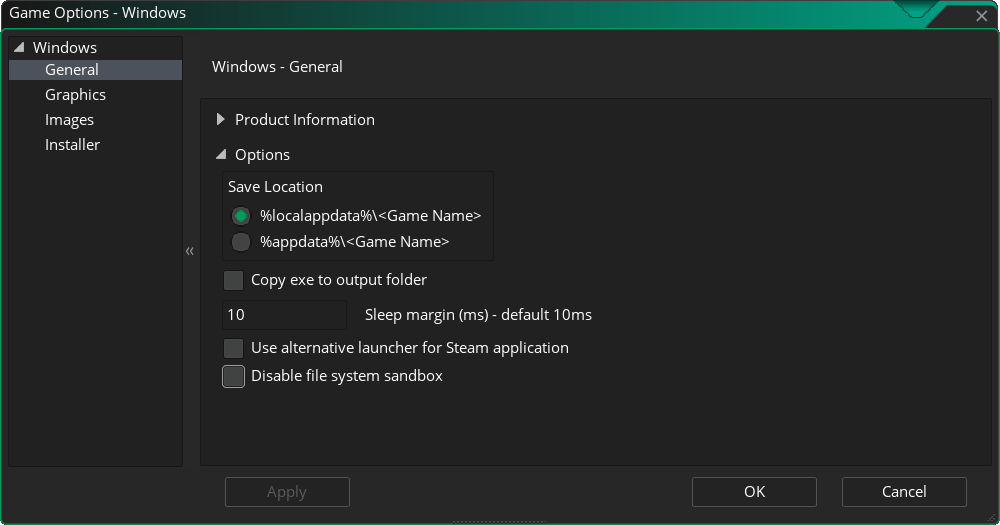
3. Disable Sandboxing
Disabling sandboxing is required for Figgy to save changes inside your project's datafiles (for Persistence), and to enable Input/Output.
- Press Ctrl+T to bring up the search bar, look for "sandbox", and select your target platform.
- At the very bottom of the General/Options section, enable the Disable file system sandbox option, click Apply, and close the window.
And you're good to go! Continue to the Usage section below to set up your first configs.
TIP
If you already have Figgy installed and want to update to the latest version, check the Updating FAQ entry for instructions.
Usage
1. Setting Up
Before you can use Figgy in your game, you need to define your configuration layout inside the global FiggySetup() function.
Setup is Figgy's central hub and entry point. It's where you create your Scope Widgets, Value Widgets, and Decor Widgets - everything that appears in the Interface and becomes part of your config data struct.
In this simple example, we create a Player Window Scope Widget, which adds a new struct to the root scope of the config. Inside it, we define a single Move Speed Float Value Widget with a default value of 5, and a range from 1 to 15.
function FiggySetup() {
    Figgy.Window("Player");
        Figgy.Float("Move Speed", 5, 1, 15);
}
2. Understanding Data
Now let's see how this setup is represented in the config struct that you'll be accessing throughout your game:
{
    Player: {
        MoveSpeed: 5,
    },
}
You'll notice that our variable name "Move Speed" turned into MoveSpeed in the config. By default, Figgy removes spaces from variable names so you can access them easily without using the struct accessor with string keys, while keeping the interface label more readable.
3. Accessing Values
Now that our configs are defined in Setup and we understand how they appear in the config struct, let's actually use the MoveSpeed value in our player object.
You can access the current config struct with .GetCurrent(), which works fine for small setups, but becomes tedious once your config grows into hundreds of values. Here's the access pattern I recommend for comfortable work at scale.
Start by creating a global + macro pair for clean root access. Since the config struct reference never changes, you can store it in a global variable once and simply reuse it throughout the game.
Do this wherever you handle your game's initialization, after scripts are initialized, and before you access any configs. Usually that happens in some master object's Create event, or the first room's Creation Code:
js#macro CFG global.__config CFG = Figgy.GetCurrent();Then, in your player object's Create event, store a reference to the
Playerconfig so you can easily access its values throughout the object:
cfg = CFG.Player;- With all that set up, we can now use our config in
objPlayer's movement code. For example, here's how you could useMoveSpeedfor simple top-down movement and collision:
var _xInput = keyboard_check(ord("D")) - keyboard_check(ord("A"));
var _yInput = keyboard_check(ord("S")) - keyboard_check(ord("W"));
if ((_xInput != 0) or (_yInput != 0)) {
    var _dir = point_direction(0, 0, _xInput, _yInput);
    var _xSpd = lengthdir_x(cfg.MoveSpeed, _dir);
    var _ySpd = lengthdir_y(cfg.MoveSpeed, _dir);
    move_and_collide(_xSpd, _ySpd, objWall);
}
Now, this is all great so far, but where can we actually edit the config live while the game is running to see our changes reflected in the player movement?
4. Editing Configs Live
If at least one of the Windows you defined in Setup is marked as visible, Figgy will automatically open the Interface for you.
Otherwise, you can open it manually with show_debug_overlay(true, true);, or use this little trick to open the overlay without the FPS window:
dbg_view_delete(dbg_view("dummy", false));Once the overlay is open, go to the Views menu in the top bar. Under Views, select the Figgy: Player window created by our Window Scope Widget to access your player configs.

There, you'll see three things:
- The Controls Section that offers root-level controls over your configs and is created in all Windows by default.
- The automatic
Configssection that is created inside Windows if no Sections were used at the start. - The
Move SpeedDBG Slider created by our Float Value Widget, which we can now adjust to change the player's movement speed in real time.

That's it!
You've now seen how to get Figgy up and running in your GameMaker project - from installing the library, defining your first configs in Setup and understanding how they appear in the config struct, to accessing and using them in your objects.
By creating a global reference to your config and linking object-level shortcuts, you can comfortably scale Figgy to handle large and complex setups. And with the automatically built Interface, you can tweak values live, instantly seeing the effects in your game.
What's Next?
Next up, check out:
- The Demos page to explore the available demos.
- The Interface and Persistence pages to learn about core Figgy concepts.
- The Figgy section for an overview of the syntax and the key parts of the API.
Once that is covered, I recommend diving into the Setup section that covers Scope Widgets, Value Widgets, Decor Widgets, OnChange callbacks, and formatting tips & best practices. This is where you'll spend of your time when working with Figgy.